7 step performance plan
![]()
by Greg Vogel
![]()
PAGE ONE (OF TWO)
This article appeared in
the premier issue of RC Nitro.
This issue is no longer available.
7 step performance plan |
|
YOU'VE GOTTA admit that nitro
vehicles are very appealing. We love the high-speed excitement, the cool exhaust sounds
and the convenience of long run times, but the thought of toying with fuel lines and
linkages and tuning the engine may give some second thoughts. In our magazine we provide
tips to help you tune your engine and clutch, but the focus of this article is on all the
other little things that get a nitro-powered vehicle running properly. Let's get your
nitro vehicle on the road— or off the road—as the case may be!
![]()
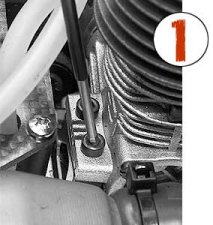 Install engine screws with a Install engine screws with ahigh-quality ball-end Allen driver that allows you to firmly tighten them without damaging their heads. |
ENGINE
MOUNTING
Bolting in the engine is easy, but I have a few suggestions that can make the task even easier. Most engines require engine mounts to attach them to the chassis. In a few instances, the mounts are cast onto the engine blocks, but if you must install separate mounts, first remove the head to allow better access to the mounting screws. Unbolt it carefully so you don't lose any head shims or screws, and then you will be able to reach the four mounting bolts with your screwdriver or Allen driver, and you won't have to use the tool at an angle and risk destroying the screwhead or cross-threading the screw into the mount. If you prefer not to take the head off, a ball-head Allen driver held at an angle will allow you to install a screw. Remember to use thread-locking compound when you install the bolts on the mounts to prevent the screws from loosening because of the engine's intense vibration. Check the position of the mounts; some are drilled to accept several engines-bolt patterns; this must be taken into consideration. If the flywheel doesn't sit close to the center of the flywheel opening in the chassis, or if the gears don't line up, you know you've picked the wrong holes. |
| GEAR
MESH
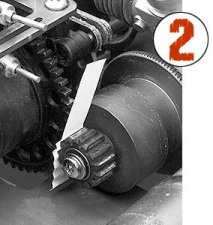
Now that the mounts have been installed on the engine, it's time to bolt the assembly to the chassis; but it isn't as simple as it sounds. As you bolt down the engine, for proper mesh, you must align the engine's clutch-bell gear with the spur gear. The easiest, most sure-fire, get-it-right-every-time method is to place a small piece of notebook paper between the clutch bell and the spur gear and apply a little pressure to make the paper conform with the teeth. While you hold the two gears together, tighten the engine-mounting screws. Then remove the paper and inspect the play between the gears; there should be very little—just enough to ensure that the gears do not bind when they make a full rotation. Right: A small strip of paper is all you need to achieve the perfect gear mesh. Squeeze the gears together with the paper between them, and tighten the bolts. |
 |
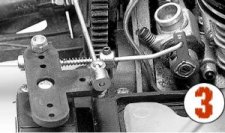 |
| LINKAGE Ah, if only this were as easy as using an electronic speed control’s one-touch setup. Instead, setting up the linkage can be just as difficult as tuning the engine. Start with the linkage that controls the throttle. Notice the engine’s throttle arm: if it has a barrel carburetor, the arm will most likely have two holes. On an inexpensive radio that doesn’t have throttle endpoint adjustments, use the lower hole to open the carburetor all the way at full throttle. On a radio with endpoint adjustments, you can use the top hole and adjust the endpoint on the radio to obtain full throttle. The link that attaches the throttle arm to the servo should be attached to the outermost hole on the servo horn. This will allow full throw for full throttle; to reduce throw, move the link inward on the horn. Most nitro vehicles use a simple throttle-linkage setup of a single throttle link that connects to the throttle-servo horn with a linkage connector. Two collets are usually provided to allow adjustment of the linkage. The other end of the throttle linkage is connected to the carburetor throttle arm via Z-bends or a ball-joint/ball-cup connector. A spring is typically provided to return the throttle arm to its neutral position. Brakes are fairly easy to set up, although they don’t require a lot of servo throw to operate properly. To set up the brakes, install the brake linkage to the servo horn on the hole closest to the output shaft. Next, install the other end of the brake linkage through the brake lever. Slide a piece of fuel tubing or a spring onto the end of the linkage that connects to the brake lever. Follow this with a collet or a nut. Take up the slack in the brake linkage by sliding the collar up to the fuel tubing and the brake arm. Before you lock in the collar, snug the pieces together, but not too tightly. Now turn on your radio system to check the brake throw. In most instances, you won’t want the brakes to lock fully; you only want to slow the car for the corners. Brakes that lock may cause your vehicle to spin out when entering a turn. |
| PAGE TWO (OF TWO) |
This article appeared in the premier issue of RC Nitro. This issue is no longer available. |
 |
 |
| Left: An
example of how to seal the exhaust; to keep your car clean, flare the inlet of the tuned
pipe. This prevents the pipe from separating from the exhaust coupling. Right: Exhaust leaking from the seams of a multiple-piece pipe can make a real mess. Disassemble the pipe and seal the seam with high-temperature gasket sealant. ATTACHING THE EXHAUST Bolt it up and run it. Yeah, you could do that, but you face potential problems if you don't mount your exhaust properly. Canister- or airplane-style mufflers. Many are composed of several pieces. Take apart the canister and seal the edges where the pieces meet so exhaust gases and oils don't leak out. Is this step really necessary?—only if you want to keep your car clean! Use a high-temperature gasket sealant from your local automotive store. Gasket. Install the gasket that goes between the manifold and the engine. Many people omit this gasket, and exhaust oil leaks onto the engine and manifold and causes a big mess. Tuned pipe. Believe it or not, many people do a poor job of installing a tuned pipe and end up with a bent exhaust tip or a pipe that falls off during a run. Insert the tip of a large screwdriver into the manifold, and with a little pressure, roll it around the edges to form a small lip. Follow the same procedure for the tuned pipe. Next, clean the ends of the manifold and the pipe with denatured alcohol, or a similar degreasing cleaner. Then slide the silicone coupler over the lip into place, and secure the coupler with two zip-ties, one on the pipe and one on the manifold. It will be well worth your effort, as it won't come off during a race. Install the exhaust assembly on your car. The exhaust tip should be angled slightly downward but should come out through the side of the car. You do not want it to point straight down because if it does, oil will spill onto the rear tires and the exhaust tip may bend going over a bump. An exhaust tip that angles too far up creates another problem: excess oil will not flow out but will collect and restrict the exhaust flow. With your properly aligned exhaust bolted into the car, secure the coupler with a couple of zip-ties. Cut a hole in the body for the exhaust pipe to allow the exhaust to escape. A body that covers the exhaust will not only get dirty (or probably melt), but if it presses against the exhaust tip, it might shut down the engine. |
|
FUEL-LINE
ROUTING Don't cut your fuel line too short. A too-short line from the tank to the carburetor will not get the fuel to the engine quicker; use a long piece. The fuel pick-up is usually at the bottom of the tank; when the car flips over, the fuel pick-up isn't fed any fuel and the engine uses only what's left in the lines. A short line will run out of fuel more quickly. Pressure tap. Here's another line that you should keep long to equalize the exhaust pulses that pressurize the tank. A short line transfers the pulses to the tank and can cause the fuel to foam. Secure your lines. A small piece of tubing slipped over the outside of the fuel line after it has been installed on the pressure tap of the pipe or muffler will secure it. A zip-tie works well, too. |
BATTERY
INSTALLATION To avoid this costly mistake, take a few precautions when you install your battery. n If you use an AA 4-cell, dry-cell setup, wrap a piece of electrical tape around it to prevent the cells from popping out on impact. Secure the battery with zip-ties; also, to prevent it from sliding on the mounting bracket, use Velcro�-brand fastener or double-sided tape. Always check the voltage of the battery pack. After a few runs, the battery can wear down. Consider charging your batteries every 30 to 45 minutes. If you run a 4-cell alkaline pack, change the batteries after an hour or so. Use a throttle-return
spring. If all your precautionary steps fail, the return spring will bring the engine down
to an idle when power to the throttle servo is lost (springs are available from Team Losi
and other RC sources). |
ELECTRONIC
PROTECTION |
Top Page
![]()
Return to main Index
![]()
 Right: A small strip of paper is all you need
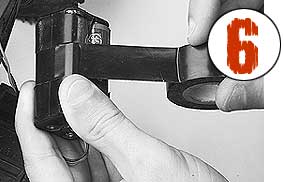 Above: A small strip of paper is all you need to achieve the perfect gear
mesh. Squeeze the gears together with the paper between them, and tighten the bolts.
Above: A small strip of paper is all you need to achieve the perfect gear
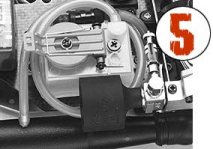
mesh. Squeeze the gears together with the paper between them, and tighten the bolts. 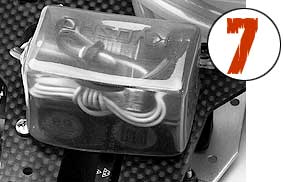 Above: A Kyosho molded receiver cover or